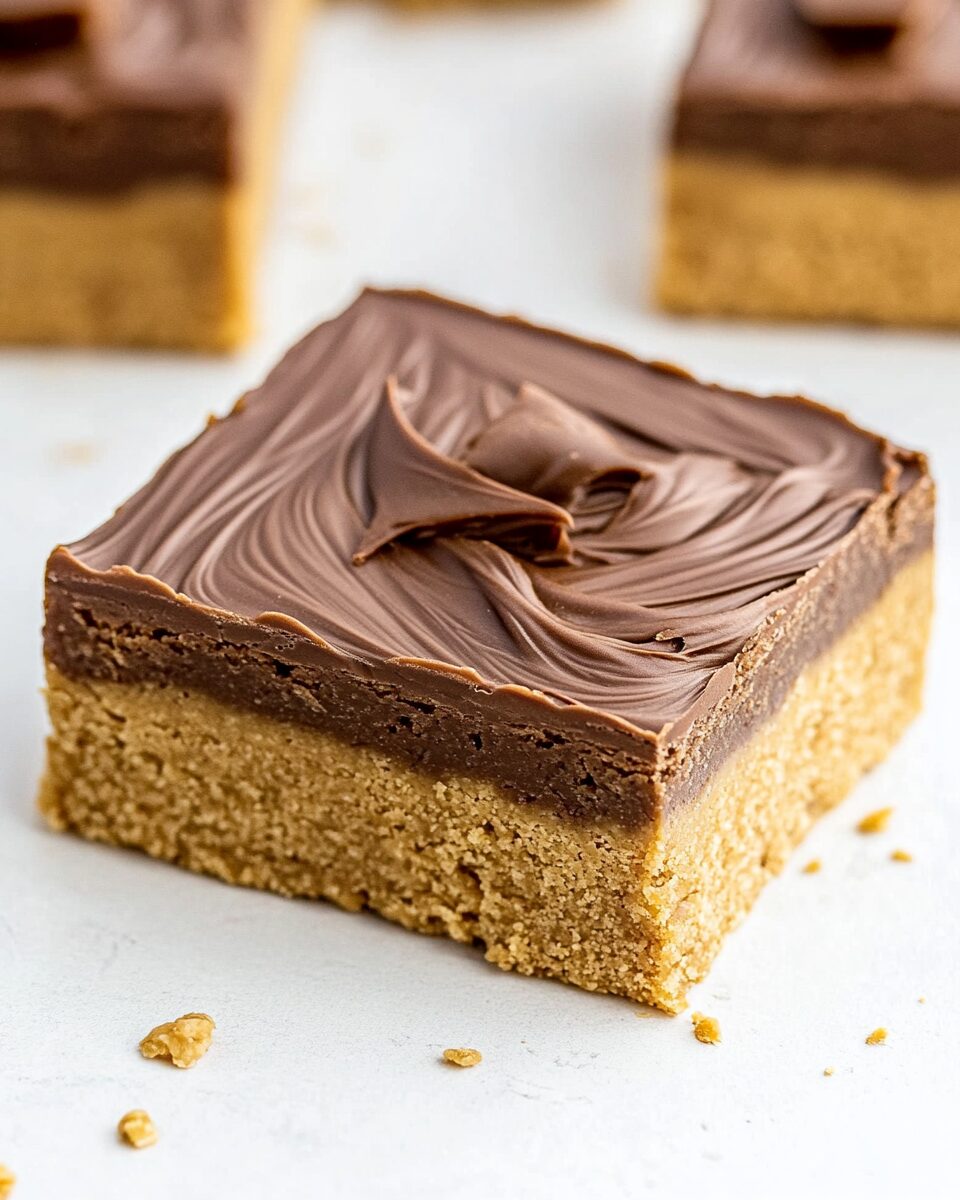
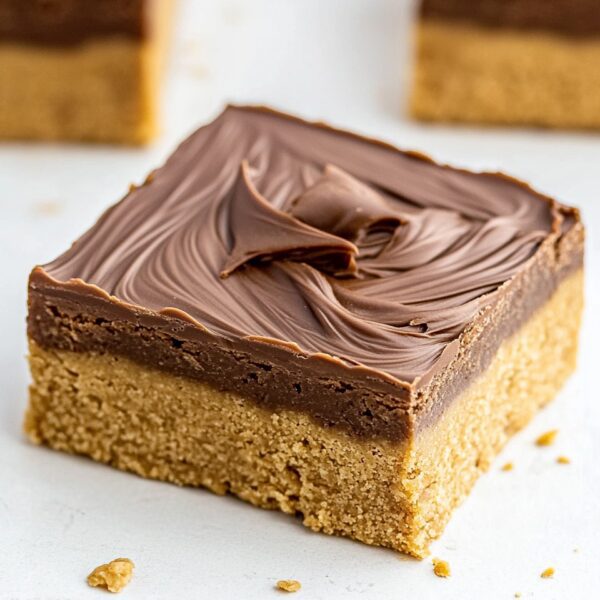
Lunch Lady Peanut Butter Bars
Lunch Lady Peanut Butter Bars are a nostalgic treat that many remember fondly from their school days. These bars capture the essence of homemade goodness, featuring a rich and creamy peanut butter flavor that pairs perfectly with a sweet chocolate topping. Not only are they delicious, but they also evoke memories of carefree afternoons spent in the lunchroom, trading snacks and sharing laughter with friends. The simplicity of these bars makes them an ideal choice for anyone looking to whip up a quick and satisfying dessert or snack. The combination of a chewy base and a smooth chocolate layer creates a delightful contrast in texture that is sure to please both kids and adults alike. With just a handful of ingredients and minimal prep time, these bars are perfect for busy parents or anyone who loves a quick, indulgent treat. Whether you’re serving them at a family gathering, packing them in lunchboxes, or enjoying them with a cup of coffee, these Lunch Lady Peanut Butter Bars are sure to be a hit.
Why You’ll Love This Recipe?
There are countless reasons to adore Lunch Lady Peanut Butter Bars, starting with their incredible taste. The rich peanut butter flavor shines through, making each bite a blissful experience. The smooth chocolate topping adds an irresistible sweetness that complements the nuttiness of the peanut butter, creating a perfect balance that keeps you coming back for more. Another reason these bars are a favorite is their ease of preparation. With minimal ingredients and straightforward steps, you can have a batch ready in no time. This makes them an excellent option for those who may not consider themselves bakers. Additionally, the versatility of these bars allows for customization according to your preferences. Whether you want to add a sprinkle of sea salt on top or mix in some crunchy peanut butter for texture, the possibilities are endless. Visually, these bars are appealing, with their glossy chocolate layer contrasting beautifully against the golden peanut butter base. They are sure to be a showstopper at any gathering, inviting everyone to grab a piece and savor the deliciousness.
Ingredients:

To create your own batch of Lunch Lady Peanut Butter Bars, gather the following ingredients:
- 1 cup unsalted butter, softened – This forms the rich base of the bars, providing a tender crumb and helping to blend the flavors together.
- 1 cup granulated sugar – This sweetener adds the necessary sweetness to the bars, balancing the saltiness of the peanut butter.
- 1 cup brown sugar, packed – The brown sugar contributes a deeper flavor and moisture, resulting in a chewier texture.
- 1 cup creamy peanut butter – The star ingredient that gives the bars their signature flavor; it also adds richness and creaminess.
- 2 large eggs – These act as a binder, helping to create structure within the bars and giving them a soft texture.
- 2 teaspoons vanilla extract – For an extra layer of flavor that complements the peanut butter and chocolate.
- 2 cups all-purpose flour – The foundation for the bars, providing structure and stability.
- 1 teaspoon baking powder – This leavening agent helps the bars rise slightly, giving them a light and fluffy texture.
- 1/2 teaspoon salt – A pinch of salt enhances the flavors and balances the sweetness.
- 1 cup semi-sweet chocolate chips – For the luscious topping, these melt beautifully to create a smooth and glossy finish.
- 1/4 cup creamy peanut butter (for topping) – Adds an additional layer of flavor that ties the bars together.
Having these ingredients on hand will ensure that you can whip up these delicious bars whenever the craving strikes. Each component plays a crucial role in achieving the perfect balance of flavor and texture, making it essential to use quality ingredients.
How To Make Lunch Lady Peanut Butter Bars?
Now that you have your ingredients ready, let’s dive into the process of making these delectable Lunch Lady Peanut Butter Bars. Follow these detailed steps for the best results:
- Preheat your oven to 350°F (175°C). Prepare a 9×13 inch baking pan by greasing it lightly or lining it with parchment paper for easy removal of the bars.
- In a large mixing bowl, cream together the softened butter, granulated sugar, and brown sugar until the mixture is smooth and fluffy. This will take about 2-3 minutes using an electric mixer on medium speed.
- Add in the creamy peanut butter and mix until fully incorporated. The mixture should be light and airy, with no visible clumps of peanut butter remaining.
- Crack the eggs into the bowl one at a time, mixing well after each addition. Then, stir in the vanilla extract until fully combined.
- In a separate bowl, whisk together the all-purpose flour, baking powder, and salt. Gradually add this dry mixture to the wet ingredients, mixing on low speed until just combined. Be careful not to overmix; you want to maintain a tender texture.
- Pour the batter into your prepared baking pan, spreading it evenly with a spatula. Smooth the top to ensure even baking.
- Bake in the preheated oven for about 25-30 minutes, or until the edges start to pull away from the sides of the pan and a toothpick inserted into the center comes out clean. The bars should be lightly golden on top.
- While the bars are baking, prepare the chocolate topping. In a microwave-safe bowl, combine the semi-sweet chocolate chips and the additional 1/4 cup of creamy peanut butter. Microwave in 30-second intervals, stirring in between, until completely melted and smooth.
- Once the bars are done baking, remove them from the oven and let them cool in the pan for about 10-15 minutes. After they have cooled slightly, pour the melted chocolate mixture over the top, spreading it evenly with a spatula.
- Allow the bars to cool completely at room temperature, then transfer them to the refrigerator to set for at least 1 hour. This will help the chocolate topping firm up nicely.
- Once set, remove the bars from the pan using the parchment paper (if used) and cut into squares or rectangles. Serve and enjoy!
Tips For Variations:
One of the best aspects of Lunch Lady Peanut Butter Bars is their versatility. While the classic recipe is undeniably delicious, here are some creative ideas to customize your bars for different flavors and textures:
- For a crunchy texture, consider using crunchy peanut butter instead of creamy. This will add a delightful crunch to each bite, enhancing the overall experience.
- If you want to incorporate some additional flavor, mix in a handful of mini chocolate chips or butterscotch chips into the batter before baking. This will add extra sweetness and a different flavor profile.
- For a more decadent treat, drizzle melted white chocolate over the top after the semi-sweet chocolate has set. This not only adds visual appeal but also a contrasting flavor that pairs well with peanut butter.
- If you are looking for a nutty twist, add in some chopped nuts like walnuts or pecans to the batter. This will introduce a delightful crunch and elevate the flavor further.
- For a fun variation, try adding a layer of raspberry or strawberry jam on top of the peanut butter layer before adding the chocolate. The tartness of the fruit will complement the sweetness beautifully.
- To cut down on prep time, consider using a store-bought chocolate sauce instead of melting chocolate chips. This can save you time, while still providing a lovely topping.
- For a seasonal twist, add in some pumpkin spice or cinnamon to the batter during the fall months. This will give your bars a warm and cozy flavor, perfect for autumn gatherings.
- If you want to make these bars even more indulgent, consider topping them with whipped cream or serving them alongside vanilla ice cream for a delightful dessert.
These variations not only keep your snacks exciting but also allow you to cater to different tastes and occasions. Feel free to experiment and discover your own favorite combination!
Serving Suggestions:
When it comes to serving Lunch Lady Peanut Butter Bars, creativity can make a simple dessert feel special. Here are some ideas to inspire you:
- For a casual gathering, serve the bars on a large platter alongside fresh fruit, such as apple slices or berries. This creates a colorful and inviting display that balances the sweetness of the bars.
- Pair the bars with a glass of cold milk or a warm cup of coffee for a cozy afternoon snack. The creamy texture of the bars pairs perfectly with the creaminess of the milk, while coffee adds a rich contrast.
- For a more festive occasion, consider drizzling the bars with melted chocolate and sprinkling them with crushed peanuts or colorful sprinkles before serving. This adds an extra touch of flair and makes the dessert visually appealing.
- Cut the bars into smaller squares and package them in cellophane bags tied with a ribbon for a delightful homemade gift. They make a thoughtful treat for friends, family, or neighbors.
- For a fun twist, serve the bars with a scoop of your favorite ice cream on top. The warmth of the bars combined with the cold ice cream creates a delightful contrast that is hard to resist.
- If you’re hosting a potluck or picnic, these bars can be cut into bite-sized pieces, making them easy to share and perfect for snacking. Consider bringing along some napkins for easy cleanup!
These serving suggestions not only enhance the enjoyment of the bars but also add a personal touch to your gatherings. Whether it’s a casual family dinner or a special celebration, Lunch Lady Peanut Butter Bars will surely be a crowd-pleaser.
FAQ:
Can I freeze Lunch Lady Peanut Butter Bars?
Yes, you can freeze these bars! Allow them to cool completely, then cut them into squares. Wrap each piece in plastic wrap or foil and store them in an airtight container. They can be frozen for up to three months. Just thaw them in the refrigerator before serving.
How should I store the bars?
Store the bars in an airtight container at room temperature for up to a week. For longer freshness, keep them in the refrigerator. If you’ve added any toppings, it’s best to consume them within a few days.
Can I use natural peanut butter for this recipe?
While natural peanut butter can be used, it may affect the texture of the bars. Natural peanut butter tends to be thinner and can lead to a different consistency. If you do use it, make sure to stir it well before measuring to incorporate the oil.
What can I use instead of chocolate chips?
If you prefer a different topping, you could use white chocolate chips or carob chips. Alternatively, you can melt down any favorite chocolate bar to create a unique topping that suits your taste.
Are there any nut-free options for this recipe?
Yes, you can substitute the peanut butter with sun butter or soy nut butter for a nut-free version. This will provide a similar texture and sweetness while accommodating those with nut allergies.
Lunch Lady Peanut Butter Bars
Equipment
- Mixing Bowl
- 9x13-inch Baking Pan
- Microwave-safe Bowl
Ingredients
Base Ingredients
- 1 cup unsalted butter, softened Forms the rich base of the bars.
- 1 cup granulated sugar Adds sweetness to the bars.
- 1 cup brown sugar, packed Contributes a deeper flavor and moisture.
- 1 cup creamy peanut butter Gives the bars their signature flavor.
- 2 large eggs Acts as a binder for the bars.
- 2 teaspoons vanilla extract Enhances the flavor.
Dry Ingredients
- 2 cups all-purpose flour Provides structure to the bars.
- 1 teaspoon baking powder Helps the bars rise slightly.
- 1/2 teaspoon salt Enhances flavors.
Topping Ingredients
- 1 cup semi-sweet chocolate chips For the luscious topping.
- 1/4 cup creamy peanut butter (for topping) Adds an additional layer of flavor.
Instructions
- Preheat your oven to 350°F (175°C). Prepare a 9x13 inch baking pan by greasing it lightly or lining it with parchment paper.
- Cream together the softened butter, granulated sugar, and brown sugar until smooth and fluffy (2-3 minutes).
- Add the creamy peanut butter and mix until fully incorporated.
- Crack in the eggs one at a time, mixing well after each addition, then stir in the vanilla extract.
- In a separate bowl, whisk together the flour, baking powder, and salt. Gradually add to the wet ingredients, mixing on low speed until just combined.
- Pour the batter into the prepared baking pan and spread evenly.
- Bake for 25-30 minutes, or until edges pull away and a toothpick comes out clean.
- While baking, prepare the chocolate topping by melting the chocolate chips and 1/4 cup peanut butter in a microwave-safe bowl.
- Once the bars are done, let them cool for 10-15 minutes, then pour the melted chocolate mixture over the top.
- Allow to cool completely, then refrigerate for at least 1 hour to set.
- Remove from the pan and cut into squares or rectangles. Serve and enjoy!