No Knead Bread
There’s something truly magical about the aroma of freshly baked bread wafting through the kitchen, a scent that evokes warmth and comfort. No knead bread is the epitome of simplicity, transforming mere flour, water, yeast, and salt into a crusty, golden loaf with a soft, chewy interior. This method celebrates the art of bread-making, allowing anyone to enjoy homemade bread with minimal effort. With just a few hands-off hours of waiting, you can produce a rustic loaf that rivals those from your favorite bakery. The beauty of no knead bread lies in its ease and versatility, making it an ideal project for both novice bakers and seasoned enthusiasts. Once you learn the basic technique, you’ll find countless ways to adapt the recipe to suit your taste and preference, making it a staple in your kitchen repertoire.
Why You’ll Love This Recipe?
There are several reasons why this no knead bread recipe stands out in the world of baking. First and foremost, the taste is simply exceptional. The slow fermentation process develops complex flavors that you wouldn’t expect from a quick-baked loaf. The crust achieves a delightful crunch, while the inside remains soft and airy, creating a perfect balance that pleases the palate.
Next, the preparation ease is a major highlight. With a minimal ingredient list and no strenuous kneading required, this recipe is perfect for bakers of any skill level. Simply mix the ingredients, let them rest, and then bake. You can easily fit this process into a busy day, making it a practical choice for anyone looking to enjoy homemade bread without dedicating hours to the task.
Finally, the appearance of no knead bread is undeniably impressive. The rustic, artisanal look is sure to impress guests and family alike. Dusting the loaf with flour before baking enhances its artisanal appeal, and the way it rises in the oven creates an enticing visual that makes it a centerpiece on any dining table. Whether served warm with butter or sliced for sandwiches, this bread is sure to attract attention and admiration.
Ingredients:

To create the perfect no knead bread, you will need the following ingredients, each carefully selected to contribute to the overall flavor and texture of the loaf:
- 3 cups all-purpose flour: This is the foundation of your bread. All-purpose flour provides the right amount of protein, allowing the dough to rise beautifully while maintaining a tender crumb.
- 1 ½ teaspoons salt: Salt not only enhances the flavor of the bread but also strengthens gluten, which is essential for achieving the right texture. It helps in controlling fermentation as well.
- ½ teaspoon instant yeast: Instant yeast works quickly and effectively, allowing your dough to rise without the need for proofing. It’s a game-changer for those who want to keep things simple.
- 1 ½ cups warm water (about 110°F): The temperature of the water is crucial; it should be warm enough to activate the yeast but not so hot that it kills it. This will ensure a successful rise.
- Additional flour for dusting: A bit of extra flour will be needed for shaping and dusting the dough before it goes into the oven. This helps prevent sticking and gives the crust a rustic look.
- Optional add-ins: While the base recipe is fantastic on its own, consider adding herbs, spices, or cheese for an extra layer of flavor. For example, rosemary or garlic powder can elevate the taste of your bread.
With these simple ingredients, you are ready to embark on your no knead bread baking adventure. The beauty of this recipe is in its flexibility; you can easily adjust the quantities or add your favorite ingredients to create a loaf that is uniquely yours.
How To Make No Knead Bread?
Making no knead bread is a straightforward process that requires minimal hands-on time. Follow these detailed steps to achieve a perfect loaf:
- Mix the dry ingredients: In a large mixing bowl, combine the all-purpose flour, salt, and instant yeast. Whisk them together until evenly distributed. This step ensures that the yeast and salt do not come into direct contact before they are mixed with water, which can affect the fermentation process.
- Add water: Pour in the warm water gradually, using a spatula or wooden spoon to stir the mixture until a shaggy dough forms. The dough will be sticky and rough, but that’s exactly what you want. Make sure there are no dry flour pockets remaining.
- First rise: Cover the bowl tightly with plastic wrap or a clean kitchen towel. Let the dough rise at room temperature for about 12 to 18 hours. This long fermentation time is crucial for developing flavor. You’ll know it’s ready when the surface is dotted with bubbles and the dough has doubled in size.
- Shape the dough: After the first rise, lightly flour your work surface and gently scrape the dough out of the bowl. With floured hands, fold the dough over itself a couple of times to form a rough ball. Do this gently to avoid deflating the dough too much.
- Second rise: Place the shaped dough seam-side down on a sheet of parchment paper, then cover it with a kitchen towel. Allow it to rise for another 1 to 2 hours, or until it has puffed up noticeably.
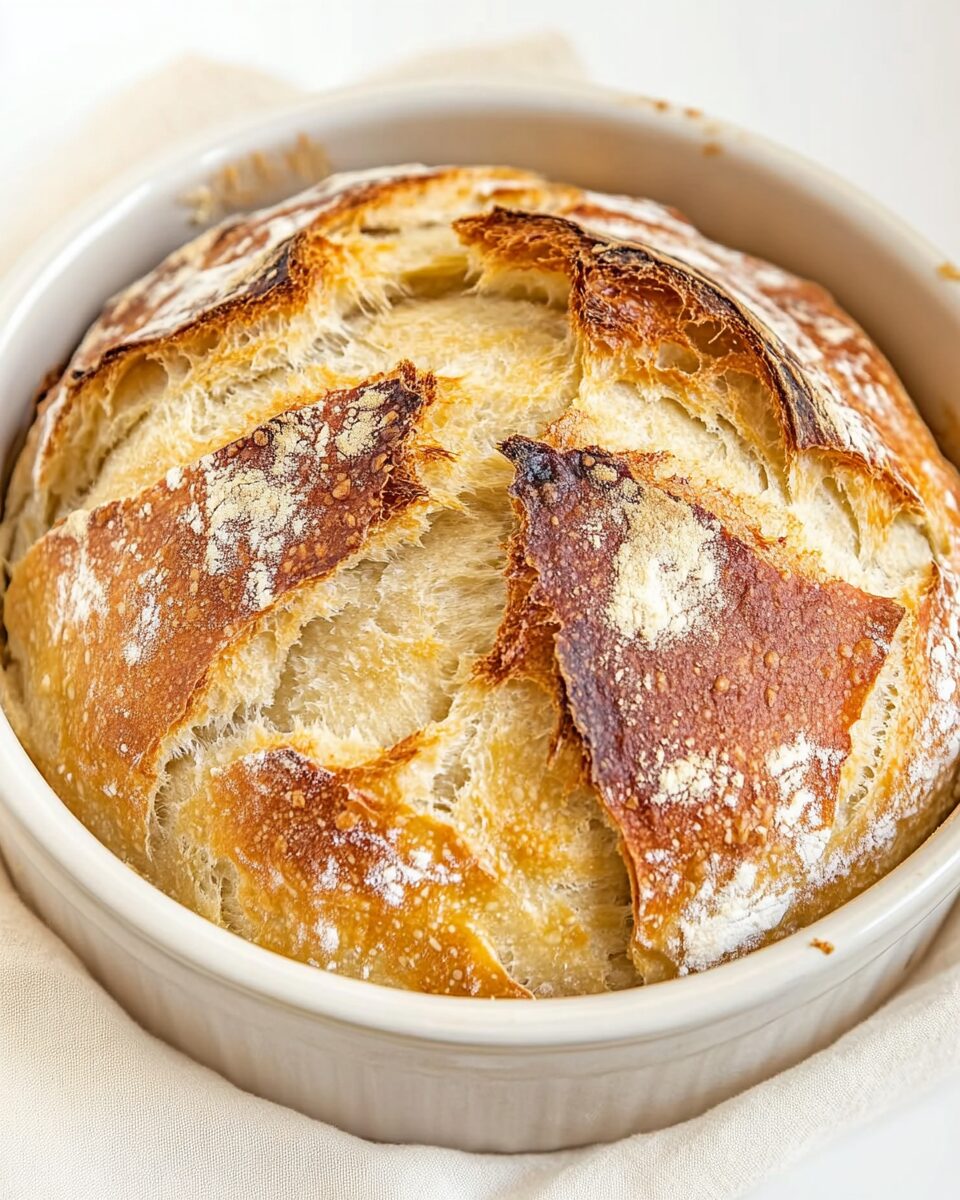
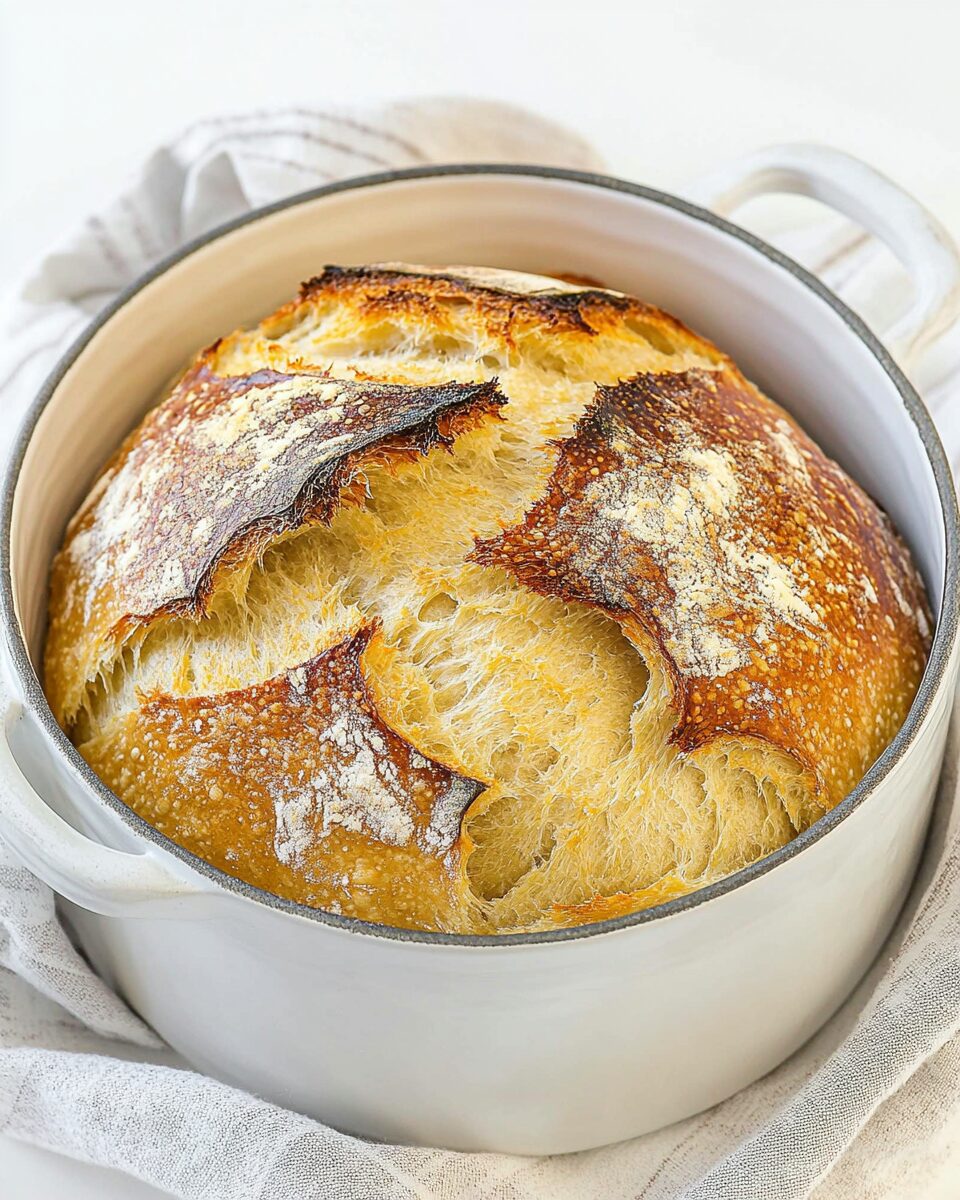
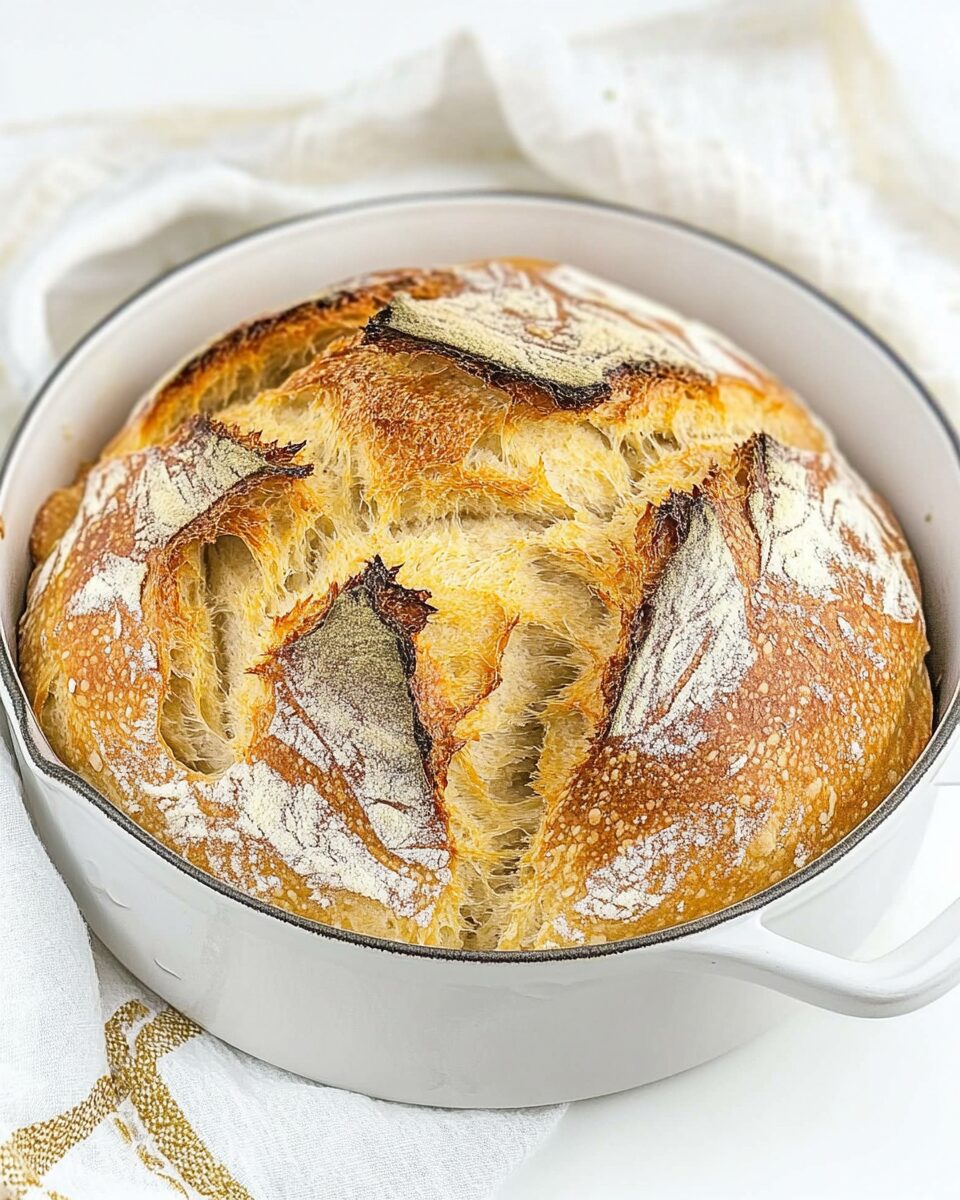
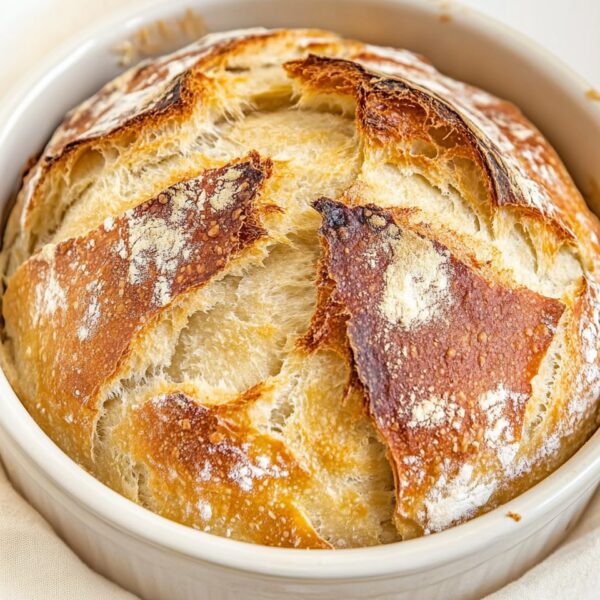
- Preheat the oven: About 30 minutes before the second rise is complete, preheat your oven to 450°F (232°C). Place a Dutch oven or heavy pot with a lid inside to heat up. This step is essential as it creates steam while baking, resulting in a crusty exterior.
- Transfer the dough: Once the oven has preheated, carefully remove the Dutch oven (it will be hot!). Lift the parchment paper with the dough and place it into the pot. Cover with the lid. This step traps steam, which is vital for a beautiful crust.
- Bake: Bake the bread covered for 30 minutes. After that, remove the lid and bake for an additional 15-20 minutes, or until the crust is golden brown and the loaf sounds hollow when tapped.
- Cool: Once baked, carefully remove the bread from the pot and transfer it to a wire rack. Allow it to cool completely before slicing. This cooling time is important as it helps set the crumb and enhances the overall texture.
By following these steps, you’ll have a stunning loaf of no knead bread ready to be enjoyed. The process may seem lengthy, but the majority of the time is hands-off, allowing you to go about your day while the dough works its magic. The end result will be a loaf that you can be proud of, with a crust that crackles and a soft interior that is perfect for sandwiches or toasting.
Tips For Variations:
One of the great things about no knead bread is its versatility. With a few simple tweaks, you can create variations that suit your taste or make use of what you have on hand. Here are some creative ideas to consider:
- Herbed Bread: Add dried herbs such as oregano, basil, or thyme to the dry ingredients for a flavorful twist. Fresh herbs can also be folded into the dough during the shaping stage for an aromatic loaf.
- Cheese Bread: Incorporate shredded cheese, such as cheddar or mozzarella, into the dough for a cheesy delight. You can add the cheese during the mixing stage or sprinkle it on top before the second rise for a melty crust.
- Olive and Sun-Dried Tomato Bread: Fold in chopped olives or sun-dried tomatoes for an Italian-inspired bread. These ingredients will add flavor and texture, making each slice a culinary experience.
- Whole Wheat Variation: Substitute half of the all-purpose flour with whole wheat flour for a heartier loaf. Keep in mind that this may require slight adjustments in hydration, so monitor the dough’s consistency.
- Sweet Bread: For a slightly sweet variation, add honey or sugar to the water before mixing. You can also fold in dried fruits like cranberries or raisins for a delightful breakfast bread.
- Spice it Up: Experiment with spices such as cinnamon or nutmeg if you desire a warm, aromatic flavor. These spices can be combined with sweet variations for an inviting twist.
- Gluten-Free Option: For those looking for a gluten-free alternative, consider using a gluten-free flour blend. Make sure to check the instructions on the blend for the right ratios and hydration adjustments.
These variations not only allow you to customize your bread to suit your tastes but also make it easier to adapt to seasonal ingredients or what you have available in your pantry. The possibilities are endless, and each new variation brings a fresh take on this classic recipe.
Serving Suggestions:
Once your no knead bread is baked and cooled, it’s time to enjoy its deliciousness. Here are some creative serving suggestions to elevate your bread experience:
- With Spreads: Serve slices of your no knead bread with a selection of spreads. Consider butter, flavored oils, or hummus for a simple yet satisfying pairing. A sprinkle of sea salt on softened butter can add an elegant touch.
- For Sandwiches: Use the bread as the foundation for hearty sandwiches. Layer your favorite deli meats, cheeses, and fresh vegetables for a satisfying meal. The crusty exterior and soft interior make it ideal for holding fillings without getting soggy.
- As a Side: Present slices alongside a bowl of soup or stew. The bread is perfect for dipping, soaking up the flavors of your dish while adding a delightful texture contrast.
- Toast it Up: Toast slices for breakfast and top them with avocado, poached eggs, or a spread of your choice. The crunchiness from toasting enhances the overall flavor experience.
- Bruschetta: Make a quick bruschetta by topping toasted slices with diced tomatoes, basil, and a drizzle of balsamic glaze. This refreshing appetizer is perfect for gatherings.
- Cheese Board: Include your no knead bread on a cheese board with a variety of cheeses, fruits, and nuts. The bread serves as a great vehicle for enjoying different flavors.
- Grilled Cheese: Use slices of your no knead bread to create a gourmet grilled cheese sandwich. Experiment with different types of cheese and add-ins like tomatoes or spinach for a delicious twist.
These serving suggestions highlight the versatility of no knead bread and demonstrate how it can complement a wide range of dishes. Whether you choose to enjoy it simply with butter or elevate it to an impressive sandwich, your no knead bread will undoubtedly be a hit.
FAQ:
Can I use whole wheat flour instead of all-purpose flour?
While you can substitute whole wheat flour, it’s best to use it in combination with all-purpose flour for the best results. Whole wheat can make the bread denser.
How do I store leftover no knead bread?
To store leftover bread, wrap it in plastic wrap or place it in a paper bag at room temperature. For longer storage, consider freezing slices in an airtight container.
Can I make this bread in advance?
Yes, you can prepare the dough the night before and allow it to rise in the refrigerator. Just let it come to room temperature before baking.
What should I do if my dough is too sticky?
If your dough is too sticky, add a bit more flour, a tablespoon at a time, during the mixing process until it reaches a workable consistency.
Why is my bread not rising?
If your bread isn’t rising, check the freshness of your yeast. Ensure the water temperature is warm enough to activate it without being too hot.
No Knead Bread
Equipment
- Mixing Bowl
- Dutch Oven
Ingredients
Dry Ingredients
- 3 cups All-purpose flour This is the foundation of your bread.
- 1.5 teaspoons Salt Enhances flavor and strengthens gluten.
- 0.5 teaspoon Instant yeast Works quickly without proofing.
Wet Ingredients
- 1.5 cups Warm water About 110°F to activate yeast.
Additional Ingredients
- Additional flour for dusting For shaping and dusting the dough.
- Optional add-ins Consider herbs, spices, or cheese.
Instructions
- In a large mixing bowl, combine the all-purpose flour, salt, and instant yeast. Whisk until evenly distributed.
- Pour in the warm water gradually, stirring until a shaggy dough forms.
- Cover the bowl tightly and let the dough rise at room temperature for 12 to 18 hours.
- Lightly flour your work surface and gently scrape the dough out. Fold the dough over itself to form a rough ball.
- Place the shaped dough seam-side down on parchment paper and cover it with a towel. Let it rise for 1 to 2 hours.
- Preheat your oven to 450°F (232°C) with a Dutch oven inside.
- Carefully remove the Dutch oven, lift the parchment with the dough, and place it into the pot. Cover with the lid.
- Bake covered for 30 minutes, then remove the lid and bake for an additional 15-20 minutes until golden brown.
- Remove the bread from the pot and let it cool completely on a wire rack before slicing.