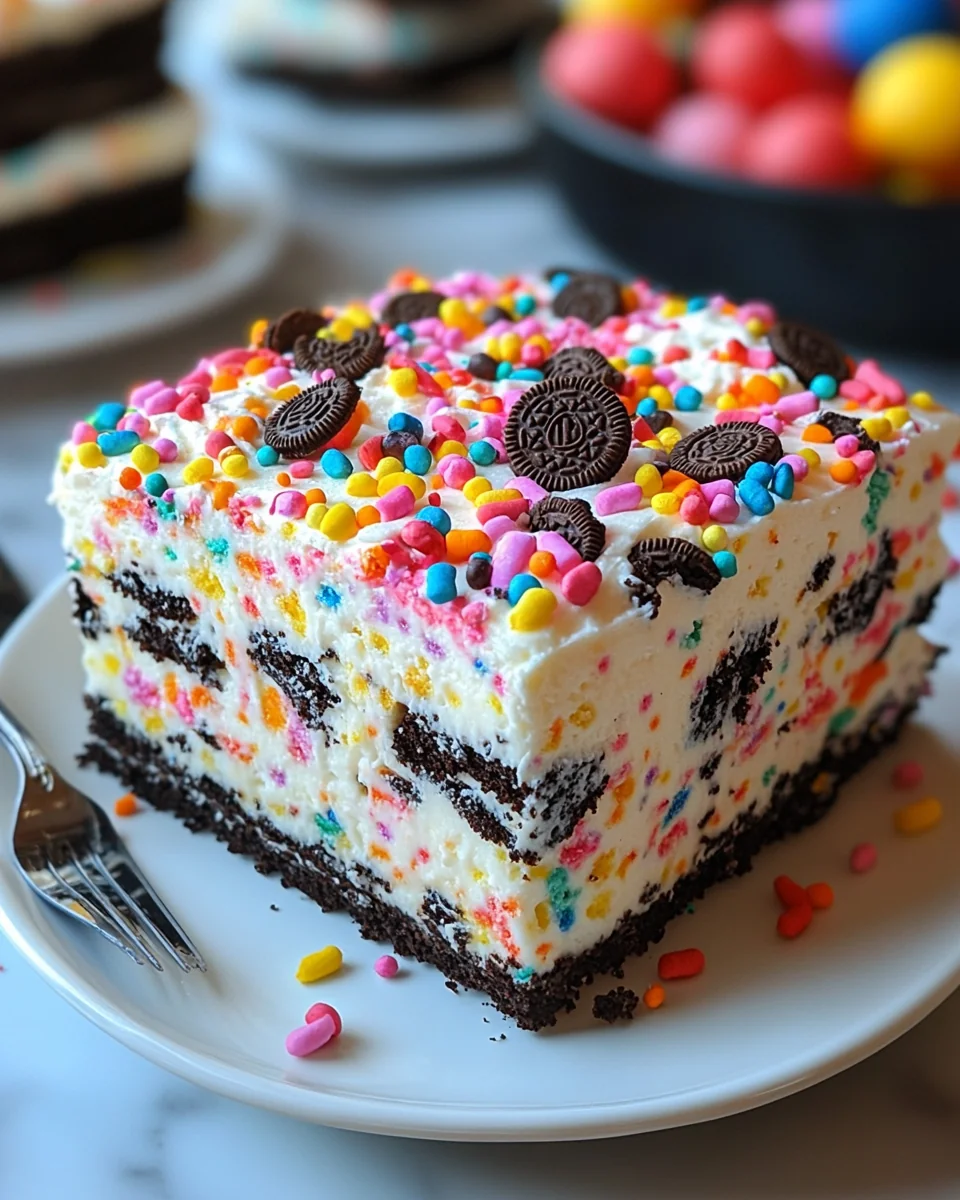
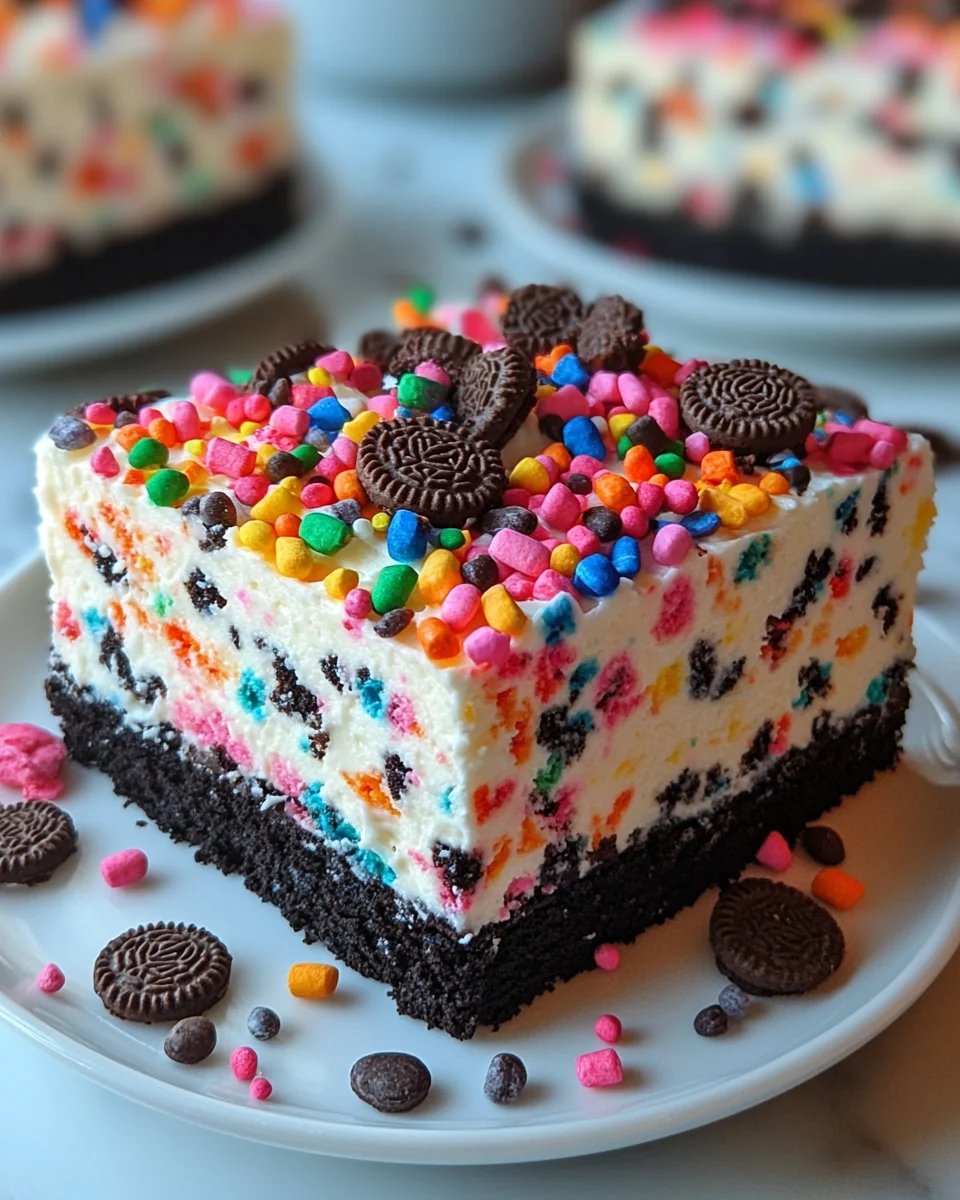
No-Bake Funfetti Oreo Icebox Cake Recipe
The No-Bake Funfetti Oreo Icebox Cake Recipe is an indulgent dessert that combines the rich flavors of chocolate and vanilla with a festive twist. This cake is perfect for a variety of occasions, from casual family gatherings to birthday parties, and it appeals to both kids and adults alike. The layers of creamy filling and crunchy Oreo cookies create an irresistible texture that every bite will have you craving more. With no baking required, this cake simplifies dessert preparation, making it ideal for weeknight meals or when you need a quick treat. The vibrant colors from the sprinkles add a fun, celebratory touch, ensuring that this No-Bake Funfetti Oreo Icebox Cake Recipe is a showstopper on any dessert table.
Why You’ll Love This Recipe?
There are numerous reasons to adore the No-Bake Funfetti Oreo Icebox Cake Recipe. First and foremost, its delightful flavor profile is a crowd-pleaser. The combination of rich chocolate from the Oreo cookies and the sweet creaminess of the filling creates a mouthwatering dessert that everyone will love. Additionally, the presence of colorful sprinkles brings a playful element, making it perfect for celebrations or just a cheerful weeknight treat.
Secondly, this recipe is incredibly easy to prepare. With no need for baking, you can whip it up in no time, which is especially beneficial for those who may not have extensive baking experience or for busy parents juggling multiple responsibilities. Simply layer the ingredients and allow the cake to set in the fridge, making it a straightforward process that yields stunning results.
Moreover, the texture of this cake is a standout feature. The creamy filling complements the crunchy Oreos, creating a delightful contrast that enhances the overall eating experience. As you bite into each layer, you’ll notice how the textures mingle, making it hard to resist going back for seconds.
Ingredients :

To make the No-Bake Funfetti Oreo Icebox Cake Recipe, gather the following ingredients:
- Oreo Cookies: You will need approximately 24 Oreo cookies to create the cake layers. These cookies, with their rich chocolate flavor and creamy filling, serve as the base of the dessert, providing a satisfying crunch that perfectly complements the soft filling.
- Whipped Topping: 2 cups of whipped topping will give the cake its creamy texture. The whipped topping lightens the dessert and adds a delicious sweetness, balancing the chocolate flavor of the Oreos.
- Funfetti Cake Mix: 1 cup of dry funfetti cake mix is crucial for this recipe. It adds flavor and a fun, colorful element to the filling, making the cake visually appealing and festive.
- Milk: You will need 1 cup of milk to mix with the cake mix and help create a smooth filling. The milk helps to hydrate the cake mix, ensuring the filling remains creamy and rich.
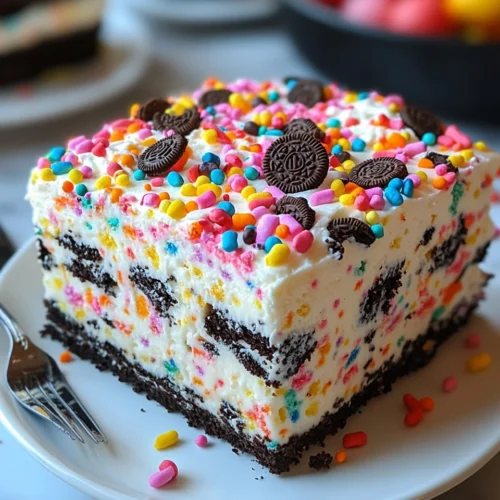
- Sprinkles: Approximately ½ cup of colorful sprinkles will add a vibrant touch to your cake. They not only enhance the visual appeal but also provide a fun, crunchy element to each bite.
- Chocolate Sauce: Optional but recommended, a drizzle of chocolate sauce can be added for an extra layer of flavor. It provides a rich, gooey texture that contrasts beautifully with the other components.
How to Make No-Bake Funfetti Oreo Icebox Cake Recipe?

Creating the No-Bake Funfetti Oreo Icebox Cake Recipe is a simple yet rewarding process. Follow these detailed steps to ensure a delicious outcome:
- Start by gathering all your ingredients to ensure a smooth preparation process. This will help you keep track of what you need and avoid any last-minute scrambles.
- Begin by crushing the Oreo cookies. Place them in a zip-top bag and use a rolling pin to crush them into fine crumbs. Alternatively, you can use a food processor for a quicker method. Set aside about 2 tablespoons of the crumbs for garnishing later.
- In a large mixing bowl, combine the whipped topping and the dry funfetti cake mix. Mix gently using a spatula until fully combined, being careful not to deflate the whipped topping.
- Slowly add the milk to the whipped topping mixture, stirring continuously until you achieve a smooth, creamy filling. The mixture should be thick yet spreadable. If it seems too thick, add a little more milk until you reach the desired consistency.
- Now, it’s time to assemble the cake. Take a rectangular dish (9×13 inches works well) and start by laying down a single layer of the crushed Oreo cookies at the bottom. Ensure the bottom is evenly covered.
- Next, spread a generous layer of the funfetti filling over the Oreo crumbs. Use a spatula to distribute it evenly across the surface.
- Continue layering by repeating the process: add another layer of crushed Oreo cookies followed by a layer of the funfetti filling until you run out of ingredients. Aim for at least three layers of filling to ensure a rich cake.
- Once the final layer of filling is spread, top it off with the reserved Oreo crumbs and sprinkle the colorful sprinkles on top for a festive touch.
- Cover the dish with plastic wrap and place it in the refrigerator. Allow the cake to chill for at least 4 hours, or preferably overnight. This resting time is crucial as it allows the flavors to meld and the cake to set properly.
- When ready to serve, remove the cake from the refrigerator. Cut into squares and drizzle the optional chocolate sauce on top for added flavor. Enjoy your easy and delicious No-Bake Funfetti Oreo Icebox Cake Recipe!
Tips for Variations:
To elevate your No-Bake Funfetti Oreo Icebox Cake Recipe or tailor it to your taste preferences, consider these creative variations:
- For a fruity twist, incorporate fresh fruit such as sliced strawberries or bananas in between the layers of funfetti filling. The freshness of the fruit will provide a delightful contrast to the rich flavors of the cake.
- If you love peanut butter, mix ½ cup of creamy peanut butter into the funfetti filling. This will add a nutty depth to the cake and complement the chocolatey Oreo layers perfectly.
- For a twist on flavors, you can substitute the funfetti cake mix with chocolate or red velvet cake mix. Each variation will bring a unique taste while maintaining the fun layering style.
- Add a layer of crushed nuts, such as walnuts or pecans, between the Oreo and funfetti layers for added crunch and a nutty flavor that pairs beautifully with the sweetness of the cake.
- Instead of chocolate sauce, try a drizzle of caramel sauce for a different flavor profile. The caramel adds a buttery sweetness that contrasts wonderfully with the other elements of the cake.
- For a more festive appearance, consider using themed sprinkles based on the occasion. For example, use holiday-themed sprinkles for Christmas or pastel colors for Easter to make your dessert stand out even more.
Serving Tips:
When it comes to serving your No-Bake Funfetti Oreo Icebox Cake Recipe, there are several ways to enhance the experience:
- Slice the cake into squares and serve on colorful dessert plates for a fun presentation. This makes it easy for guests to grab a piece and enjoy.
- This cake is perfect for a variety of occasions, including birthday parties, family gatherings, and even casual weeknight dinners. Its vibrant appearance and delicious flavor make it a hit with guests of all ages.
- Consider pairing the cake with a scoop of vanilla or chocolate ice cream for an extra indulgent treat. The cold, creamy ice cream complements the rich cake beautifully.
- Store any leftovers in an airtight container in the refrigerator for up to three days. This cake tastes even better the next day as the flavors continue to meld together.
- For special occasions like Ramadan or holiday gatherings, consider decorating the top with themed decorations or additional sprinkles to make the dessert feel even more festive.
FAQ:
How do I store leftovers?
Leftover No-Bake Funfetti Oreo Icebox Cake Recipe can be stored in an airtight container in the refrigerator for up to three days. Make sure to keep it covered to maintain its freshness and prevent it from drying out.
Can I freeze this recipe?
Yes, you can freeze the No-Bake Funfetti Oreo Icebox Cake Recipe. Wrap it tightly in plastic wrap and then in aluminum foil to prevent freezer burn. It can be frozen for up to one month. Thaw it in the refrigerator for a few hours before serving.
Can I use regular Oreos instead of funfetti Oreos?
Absolutely! You can use regular Oreos in the No-Bake Funfetti Oreo Icebox Cake Recipe. The regular chocolate cookies will still provide a delicious contrast to the funfetti filling.
How can I make this cake ahead of time?
The No-Bake Funfetti Oreo Icebox Cake Recipe is perfect for making ahead of time. You can assemble it a day in advance and let it chill overnight in the refrigerator for optimal flavor and texture.
What occasions are best for serving this cake?
This cake is versatile and can be served at various occasions, including birthday parties, family gatherings, holiday celebrations, or simply as a fun dessert for a casual weeknight dinner. Its colorful appearance makes it a festive option for any event.
No-Bake Funfetti Oreo Icebox Cake
Equipment
- Mixing Bowl
- Zip-top Bag
- Spatula
- Rectangular Dish
Ingredients
Ingredients
- 24 cookies Oreo Cookies Crushed for cake layers.
- 2 cups Whipped Topping For creamy texture.
- 1 cup Funfetti Cake Mix Adds flavor and color.
- 1 cup Milk To mix with cake mix.
- 0.5 cup Sprinkles For decoration and fun.
- to taste sauce Chocolate Sauce Optional for drizzling.
Instructions
- Gather all ingredients for smooth preparation.
- Crush Oreo cookies in a zip-top bag or food processor. Reserve 2 tablespoons for garnish.
- In a large mixing bowl, combine whipped topping and funfetti cake mix. Mix gently.
- Slowly add milk to the mixture, stirring until smooth and creamy.
- Layer crushed Oreo cookies at the bottom of a rectangular dish.
- Spread a layer of funfetti filling over the Oreo crumbs.
- Repeat layers of crushed Oreos and funfetti filling until ingredients are used up.
- Top with reserved Oreo crumbs and colorful sprinkles.
- Cover with plastic wrap and refrigerate for at least 4 hours or overnight.
- Slice and drizzle with chocolate sauce before serving.